20 KiB
Vibe Coding Personal Tool Development
Hello, I'm Yupi.
In the previous article, we learned the complete 5-step development process. Now, it's time to put this process into practice!
In this article, I'll guide you through 5 practical personal tool projects: a personal portfolio website, a to-do app (advanced version), a Markdown note-taking app, a Pomodoro timer, and a weather query app.
First, I need to clarify that this tutorial focuses more on guiding you through the thought process and project development workflow. The goal is to help you learn how to use Vibe Coding to develop projects, and you'll need to practice on your own. If you need more comprehensive Vibe Coding tutorials with images and videos, you can check out Yupi's original project实战 section.
The projects I've selected are carefully chosen, practical, and actually usable—not just toys. They are moderately challenging, suitable for beginners to practice, neither too difficult nor too simple. Technically, they cover common scenarios such as front-end development, data storage, and API calls. After completing the basic version, you can continue to add new features. More importantly, these projects can be included in your portfolio to showcase your skills.
For each project, I'll provide a complete development guide, including requirements analysis, technology selection, development steps, and expansion ideas. You can choose projects based on your interests; there's no need to complete them in order.
1. Project Practice - Personal Portfolio Website
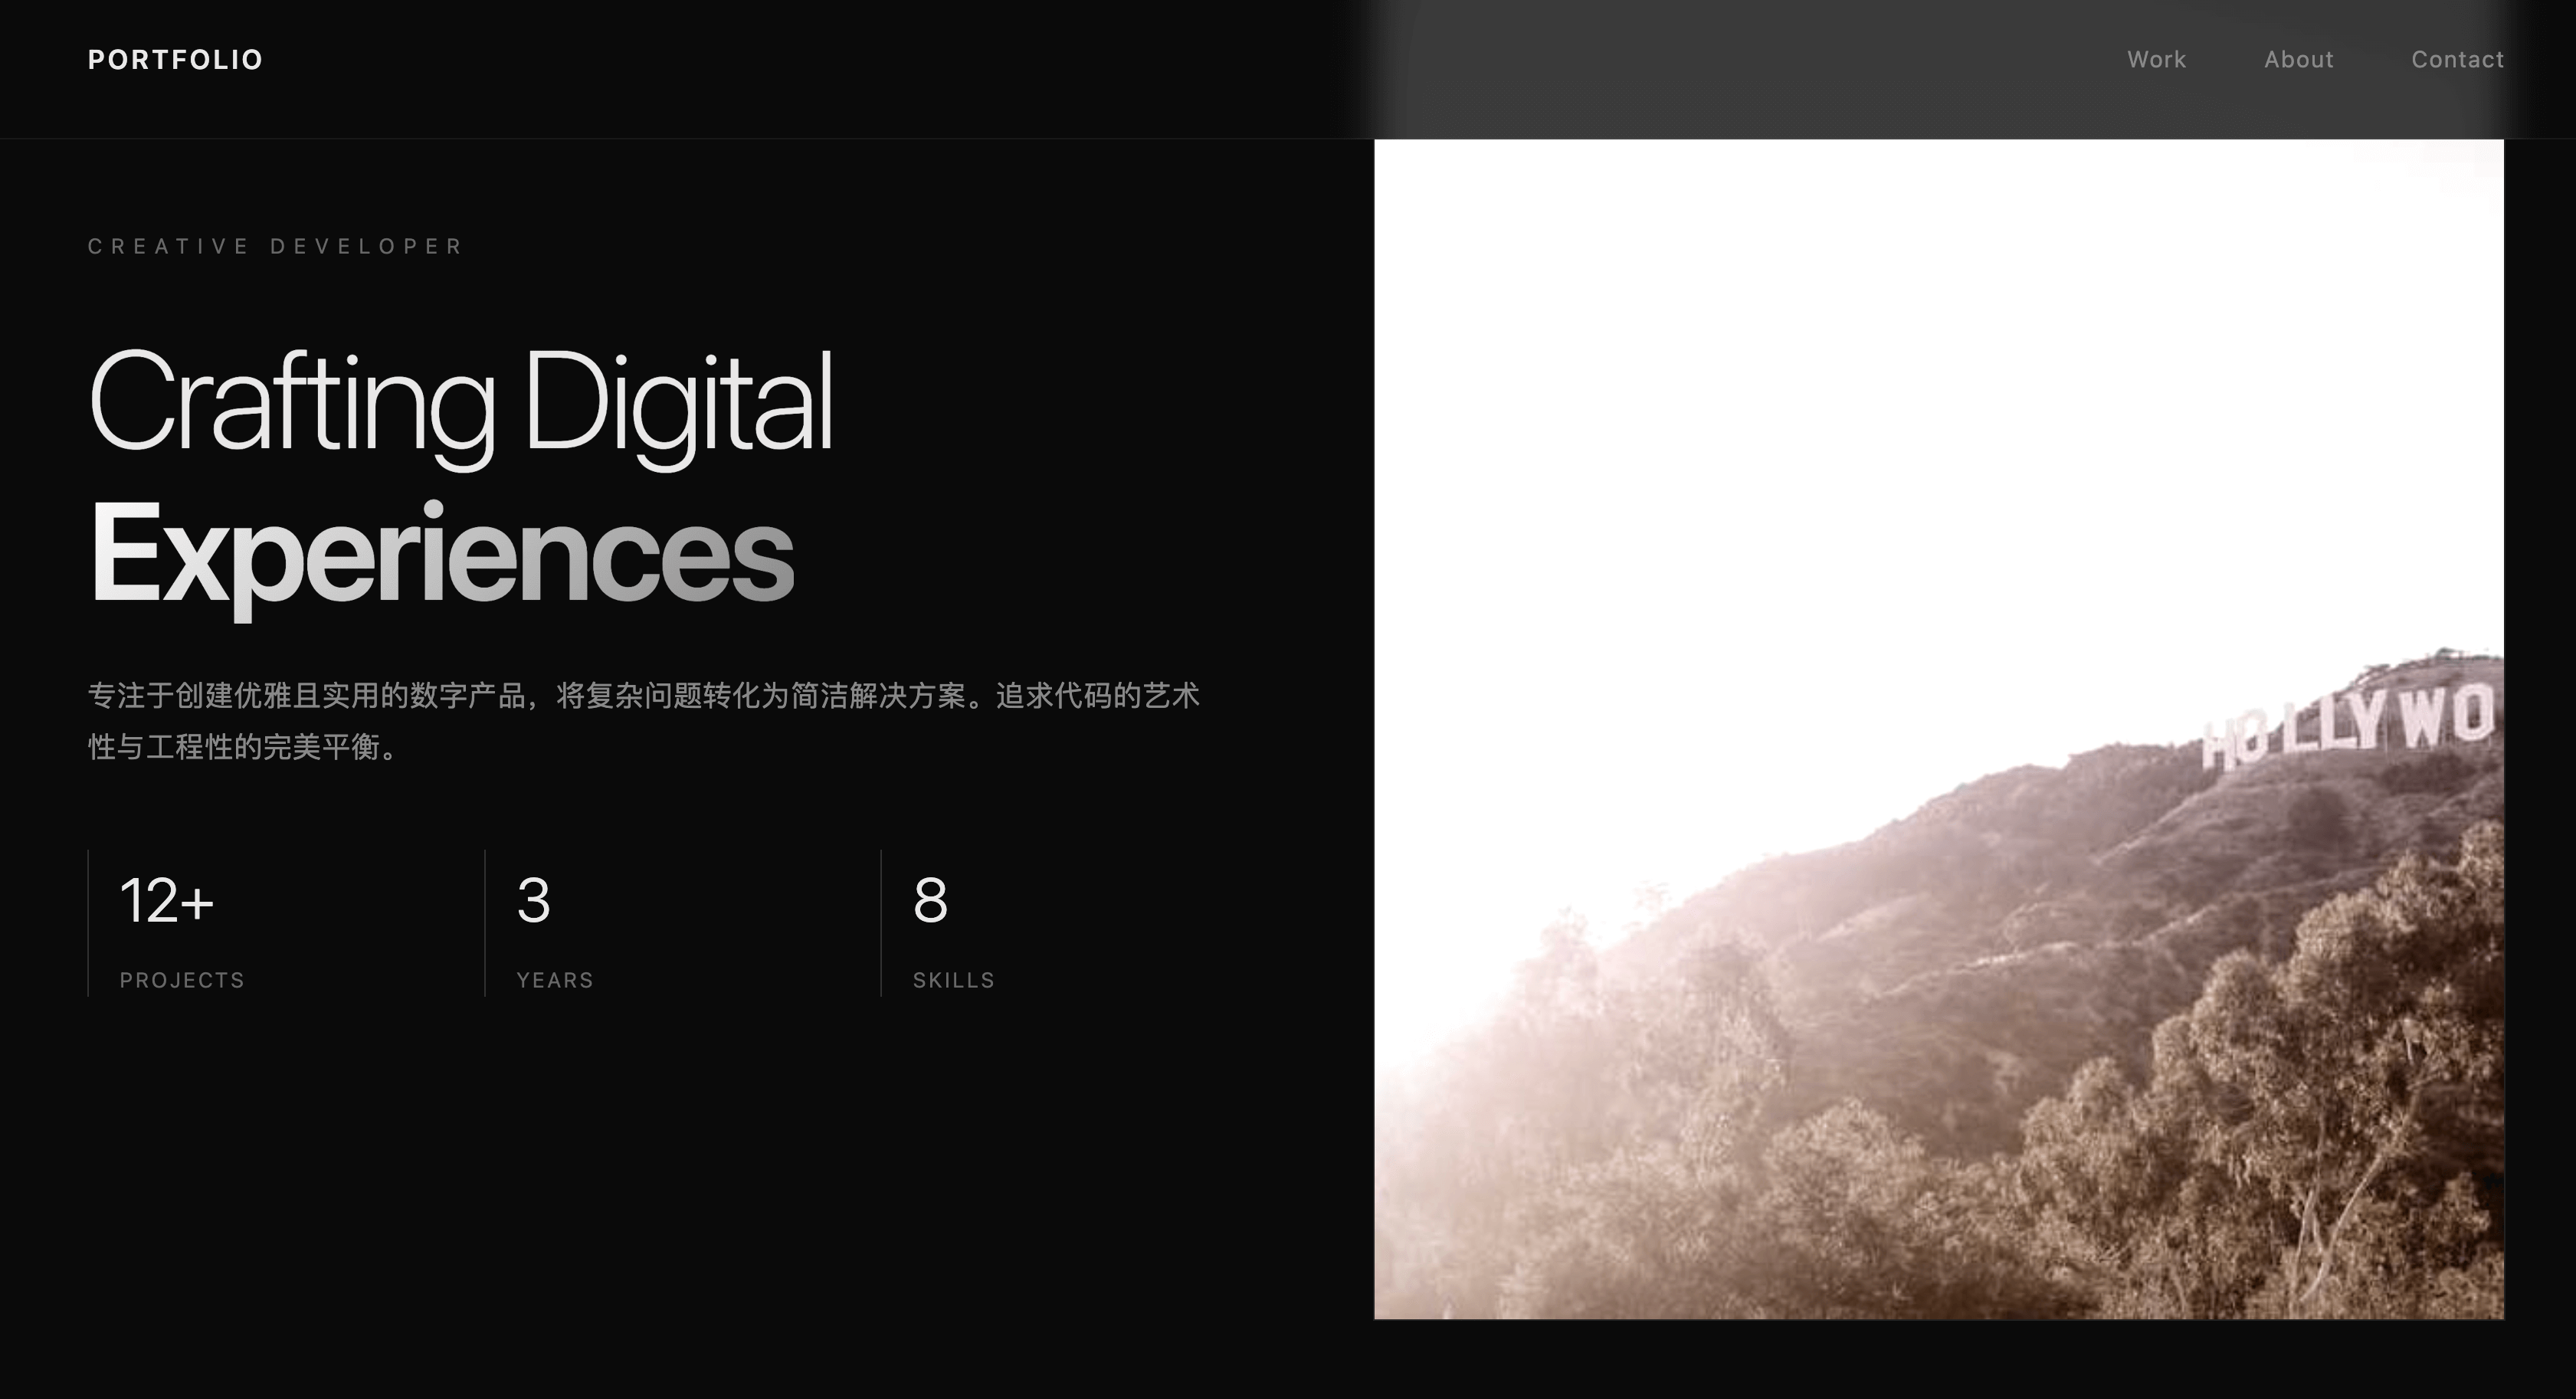
A personal portfolio website is the best way to showcase your abilities. Whether you're job hunting, freelancing, or sharing your work on social media, a well-designed portfolio website can give you an edge. Moreover, this project itself becomes your first portfolio piece—pretty interesting, right?
The website should include several sections: personal introduction (name, avatar, bio, contact information), skills showcase (technologies you know), and project showcase (projects you've done, including screenshots, descriptions, and links). The interface should be responsive, displaying properly on both mobile and desktop.
For technology selection, we'll use React + TypeScript + Vite as the front-end framework, Tailwind CSS for styling, and deploy it on Vercel. This tech stack is modern and currently the most popular front-end development solution.
Development Steps
- Requirements Research
Before developing any project, start with requirements research. You can look at other people's portfolio websites for inspiration, such as searching for "developer portfolio examples" online. Record the design styles and features you like, which can serve as references.
- Write PRD Document
After gathering inspiration, write a PRD document. Create a PRD.md file to clearly outline what you want to showcase. Here's a reference example:
# Personal Portfolio Website PRD

## Core Features
1. Homepage: Large title + bio + avatar
2. About Me: Detailed introduction + skills list
3. Project Showcase: Project card list, each card includes project name, screenshot, brief description, tech stack, project link
4. Contact: Email, GitHub, social media links

## Design Requirements
- Clean, modern design style
- Dark theme
- Smooth scrolling animations
- Mobile-friendly
This document doesn't need to be overly complex; just clearly state the core features and design requirements.
- Write Technical Design Document
Next, write the technical design document TECH_DESIGN.md. Here, determine the specific technical solutions:
# Technical Design

## Tech Stack
- React + TypeScript + Vite
- Tailwind CSS
- React Router (if multi-page is needed)
- Framer Motion (for animations)

## Project Structure
src/
  components/
    Header.tsx
    Hero.tsx
    About.tsx
    Projects.tsx
    Contact.tsx
    Footer.tsx
  data/
    projects.ts
    skills.ts
  App.tsx
  main.tsx

## Data Management
- Project and skill data stored in TypeScript files
- Use arrays for storage, facilitating future additions and modifications
This document helps the AI understand the technologies you'll use and the project structure.
- Write AGENTS.md File
Then, create the AGENTS.md file to inform the AI about development standards:
# Personal Portfolio Website Development Instructions

## Project Overview
A personal portfolio website developed using React + TypeScript + Tailwind CSS.

## Development Standards
- Use functional components + Hooks
- Write styles with Tailwind CSS
- Components should be reusable
- Code should be commented

## Design Requirements
- Dark theme (background #0a0a0a, text #ffffff)
- Use gradients as accent colors
- Add smooth scrolling animations
- Ensure mobile-friendliness

## Notes
- Keep the design clean; avoid over-designing
- Optimize performance: use lazy loading for images
- Ensure all links are clickable
This file provides development standards for the AI, letting it know how to write the code and the design style.
- Start Development
With these three documents, you can start development. Open an AI code editor like Cursor and begin interacting with the AI.
The first prompt is to initialize the project:
Based on the requirements in PRD.md, TECH_DESIGN.md, and AGENTS.md, initialize a React + TypeScript + Vite project and install Tailwind CSS.
This prompt is simple but contains all the necessary information. The AI will read these three documents and create the project structure, install dependencies, and configure Tailwind CSS as required.
Then, implement each component step by step. For example, create the Hero component:
Create a Hero component containing a large title, bio, and avatar. Use Tailwind CSS to implement a dark theme and gradient effects.
This prompt tells the AI what component to create, what content to include, and what technology to use. The AI will generate the complete component code.
Next, create the Projects component:
Create a Projects component to display a list of projects. Each project card should include a screenshot, title, description, and tech stack tags.
Continue step by step until the entire website is complete. Preview the effect in the browser after each component is completed to ensure it meets expectations.
- Deploy Online
Once development is complete, deploy it online. The deployment process is simple:
- Push the code to GitHub
- Log in to Vercel, import the GitHub repository
- Click deploy, wait for completion
- Get your website link
Vercel will automatically detect your project type and configure the build commands, making it very intelligent. After deployment, you'll have a website link that you can share with others.
Expansion Ideas
After completing the basic version, you can continue to expand features. For example, add a blog feature to share your learning experiences; add dark/light theme switching to let users choose their preferred theme; support multiple languages to attract international users; add visitor statistics to understand website traffic; or even add a guestbook feature to allow visitors to leave messages.
2. Project Practice - To-Do App (Advanced Version)
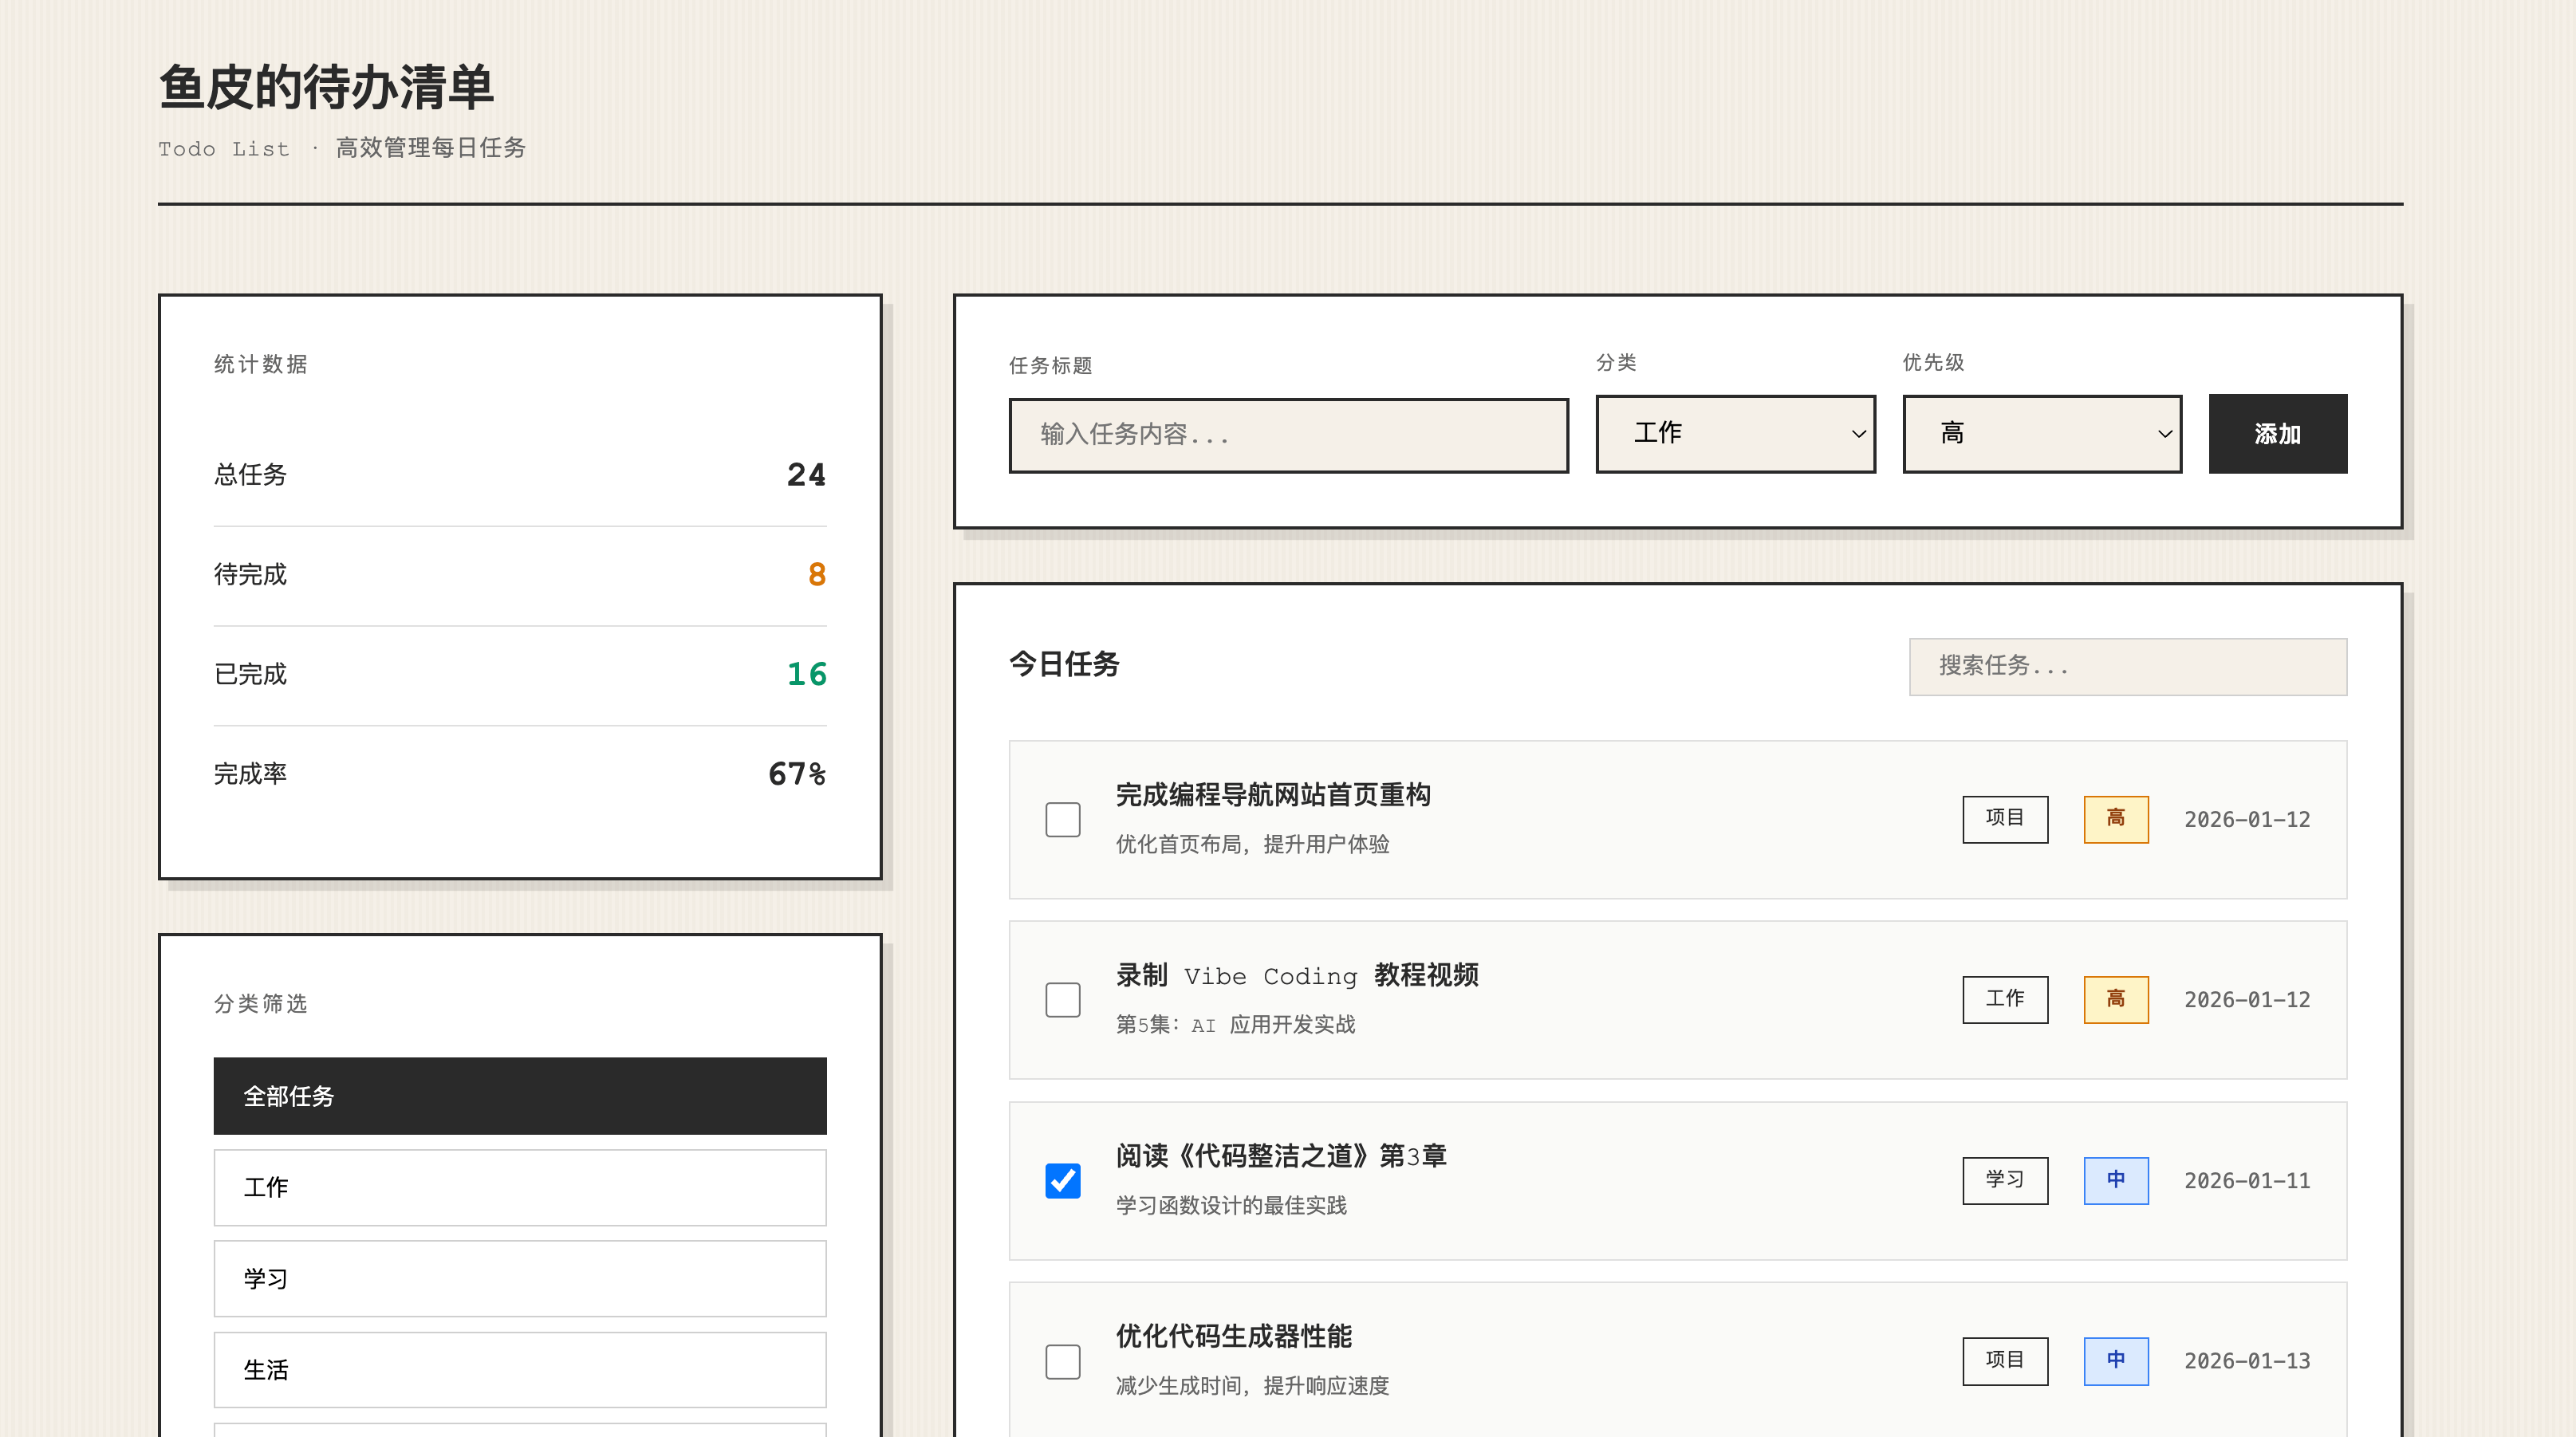
After completing the portfolio website, let's tackle a more complex project. In the quick start section, we built a simple to-do app with basic add and delete functions. Now, let's create a more powerful version to learn how to handle more complex business logic.
This advanced version has much richer features. When adding a to-do item, besides the title, you can also set a description, due date, priority, and category. When viewing the list, you can filter by category, priority, and status, and use a search function to quickly find specific to-do items. Editing and deleting are also supported. Data is saved in LocalStorage, so it won't be lost on page refresh. Additionally, there's a statistics feature to display completion rates and to-do counts.
For technology selection, we'll use React + TypeScript + Vite for the front-end, Zustand (a lightweight state management library, much simpler than Redux) for state management, Tailwind CSS for styling, date-fns for date handling, and LocalStorage for data storage.
Development Steps
- Define Data Model
The first step in development is to define the data model. You need to clearly outline the fields for a to-do item: id (unique identifier), title (title), description (description), category (category), priority (priority: low, medium, high), dueDate (due date), completed (whether completed), createdAt (creation time). Defining these fields clearly will make subsequent development smoother.
- Develop by Functional Modules
Then, develop by functional modules. The suggested order is: first implement the data storage layer, encapsulating LocalStorage read/write operations; then implement state management, creating a global store with Zustand; next, implement the add function; then implement list display and filtering; finally, implement search and statistics. This step-by-step approach ensures each module is tested and working correctly.
When interacting with the AI, you can say:
Create a Todo data model and LocalStorage utility functions.
The AI will define the data structure and encapsulate storage operations. This prompt is simple, but the AI knows what to do because it references your PRD and technical design documents.
Then say:
Use Zustand to create global state management, including methods for adding, deleting, updating, and filtering.
The AI will create a complete store with all the necessary methods. Zustand is a lightweight state management library, much simpler than Redux but powerful enough.
Next, say:
Create an AddTodo component containing form input and validation.
The AI will implement the interface and logic for the add function, including input fields, dropdown selections, and date pickers. Test each function after completion to ensure it works correctly.
Key Technical Points
This project has several key technical points to note. First is state management, as there are many features, using Zustand to manage global state will be much more convenient. You can let the AI help you create a store containing methods for adding, deleting, updating, and filtering.
The filtering function should support multi-condition filtering, such as filtering by category and priority simultaneously. The search function should support fuzzy search, finding keywords in titles and descriptions. These logics can be implemented by the AI; you just need to specify the requirements.
Expansion Ideas
After completing the basic version, you can continue to expand features. For example, add tagging functionality to allow multiple tags per to-do item; support sub-tasks, breaking a large task into smaller ones; add reminder functionality to automatically remind before deadlines; support data export to CSV; or even use Firebase for cloud synchronization.
3. Project Practice - Markdown Note-Taking App
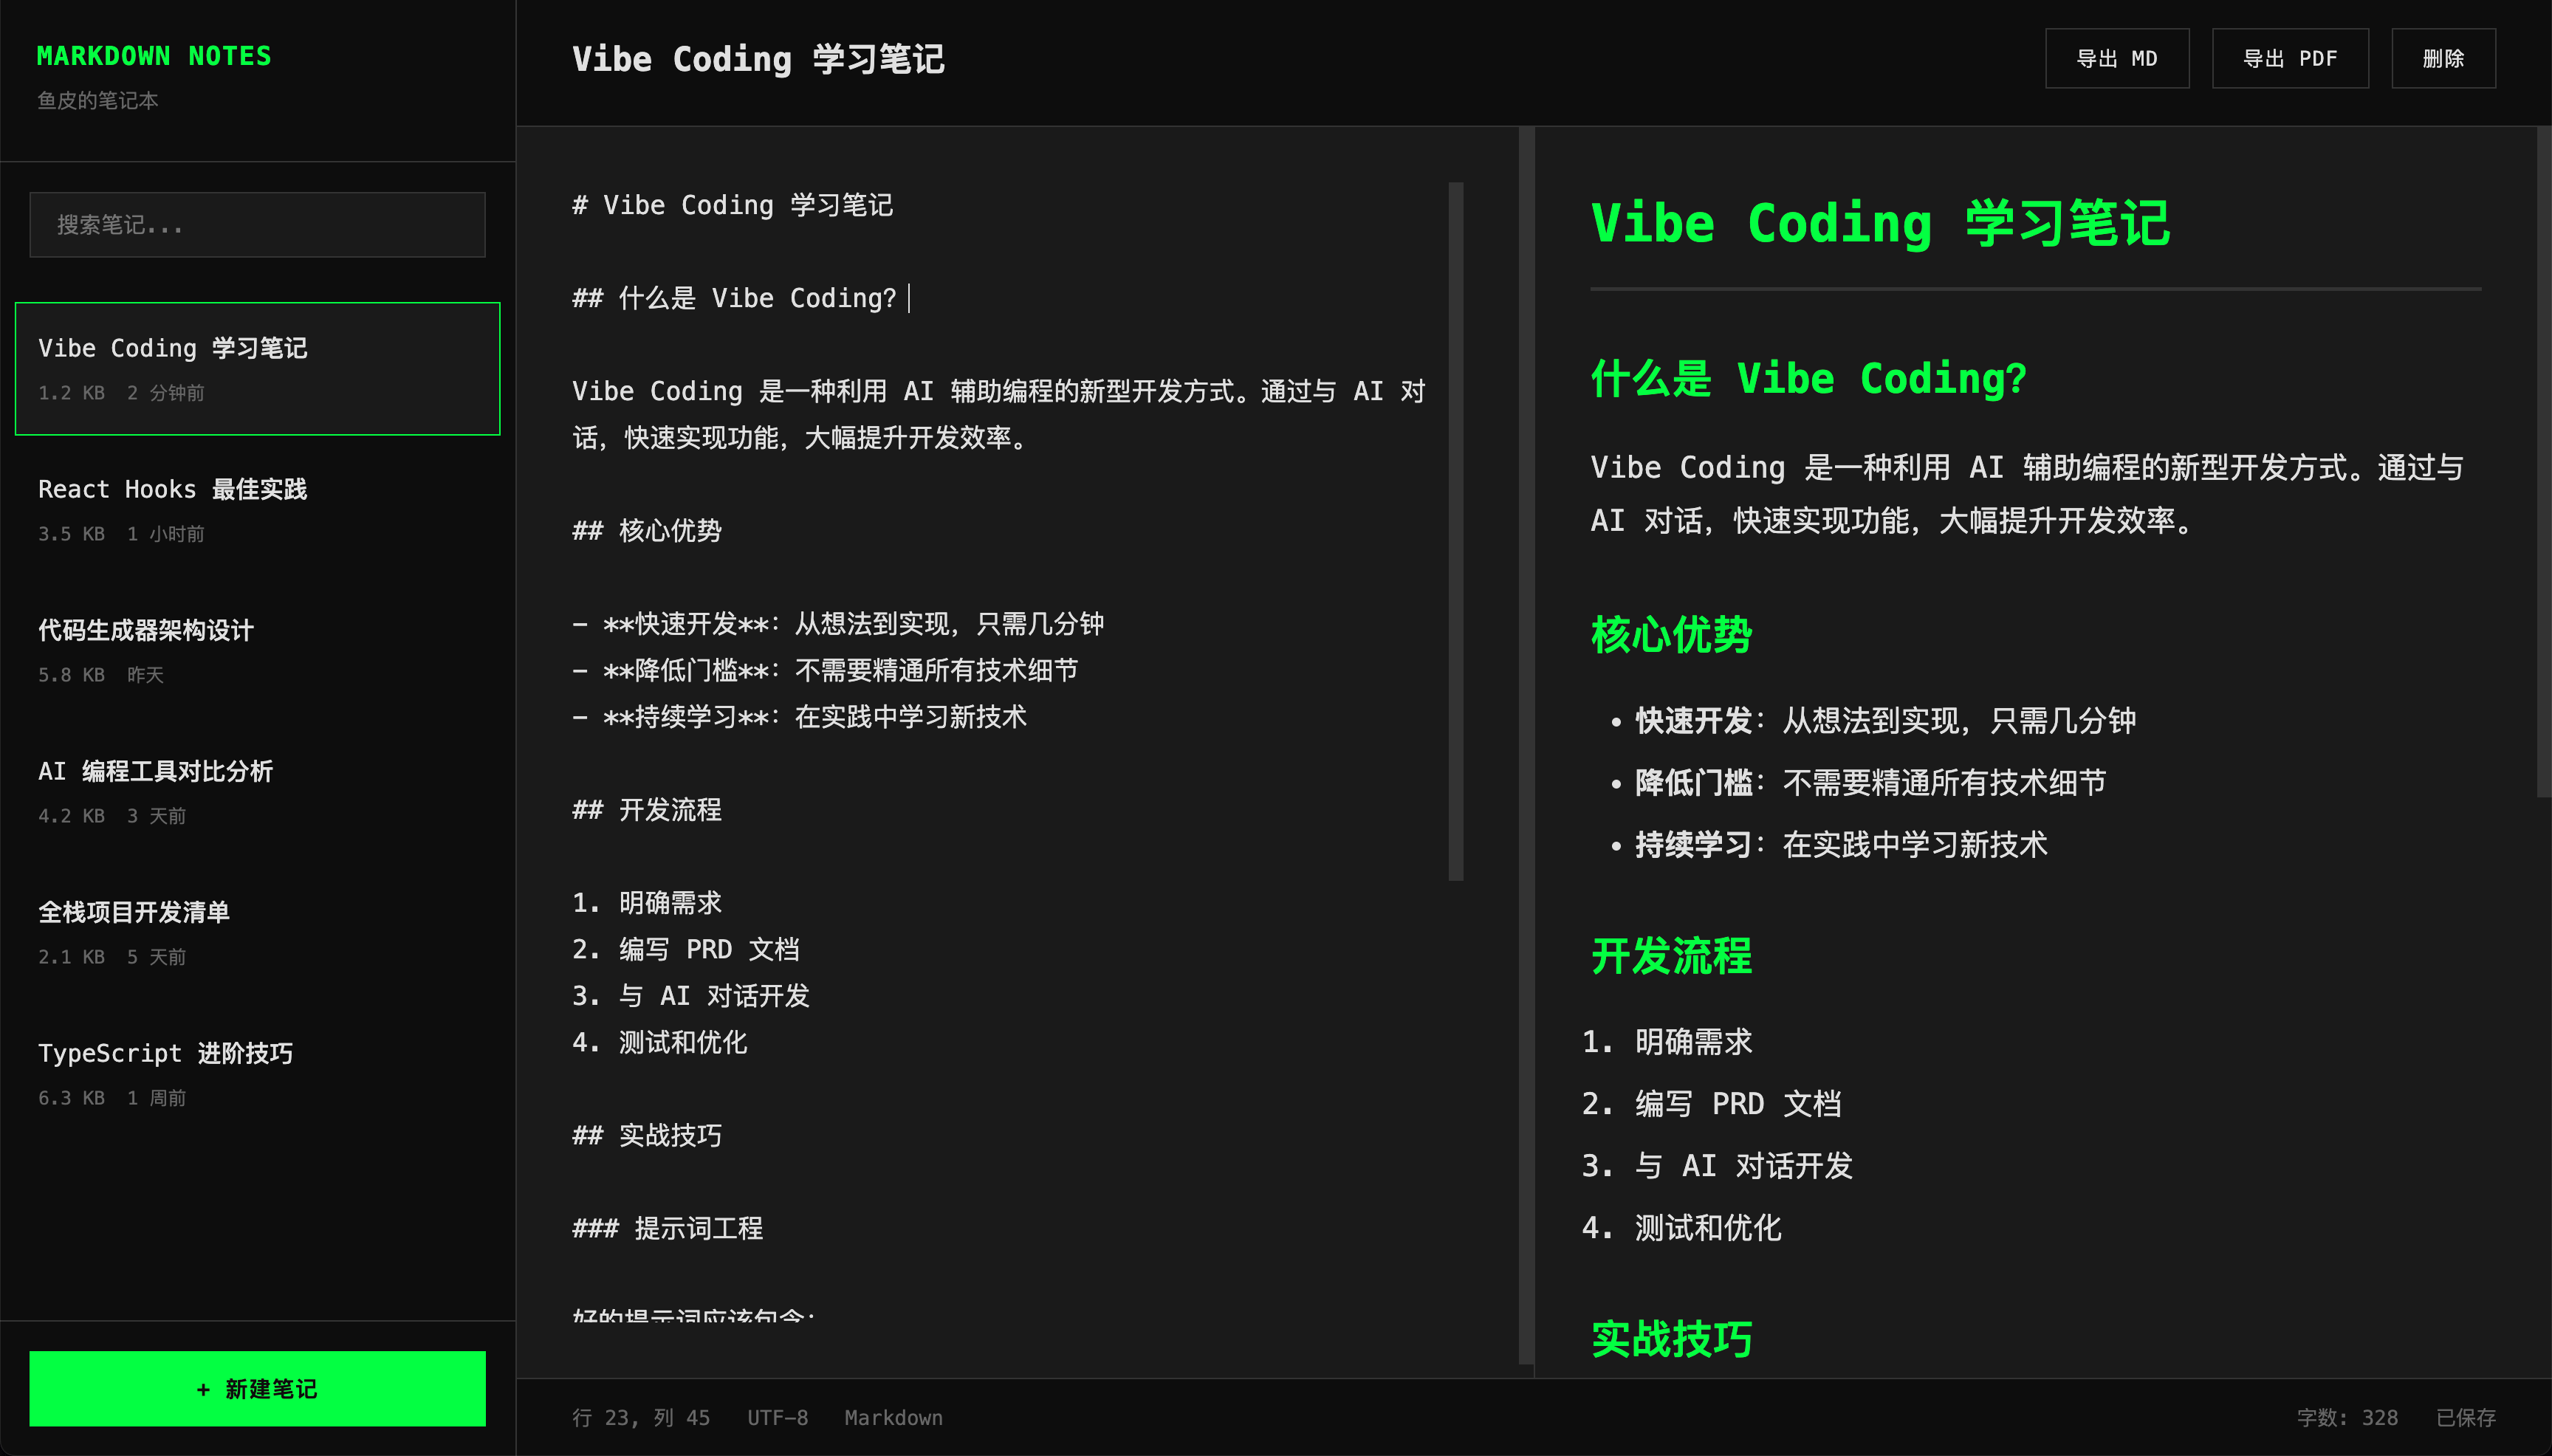
After mastering state management and data filtering, let's learn how to handle text editing and real-time preview. Markdown is the most commonly used document format by programmers, and building a Markdown note-taking app will help you learn how to handle text editing, real-time preview, and other functionalities.
This project aims to implement a complete Markdown note-taking app. Users can create notes, input titles and content. The interface adopts a split-screen layout, with the editor on the left and real-time preview on the right. The left side also displays a list of notes, supporting search. Data is saved in LocalStorage, and note deletion is supported. Code blocks should have syntax highlighting for a more professional look.
For technology selection, we'll use React + TypeScript + Vite for the front-end, react-markdown for Markdown parsing, react-syntax-highlighter for code highlighting, Tailwind CSS for styling, and LocalStorage for data storage.
Development Steps
- Implement Basic Layout
The first step in development is to implement the basic layout, creating a split-screen layout with the editor on the left and the preview area on the right. This layout is easily achieved using Tailwind CSS's Flex or Grid.
Tell the AI:
Create a split-screen layout with the Markdown editor (large text box) on the left and the preview area on the right. Use Tailwind CSS to implement a responsive layout.
The AI will create a beautiful split-screen layout, displaying as left-right on desktop and top-bottom on mobile.
- Integrate Markdown Parsing
Then, integrate Markdown parsing. Using the react-markdown library, you can easily convert Markdown text to HTML. Just pass the text to this component, and it will render automatically.
Tell the AI:
Use react-markdown to convert Markdown text to HTML and display the rendered result in the preview area.
This prompt is concise, but the AI knows what to do. It will install the react-markdown library, import the component, and use it in the preview area.
- Implement Real-Time Preview
Next, implement real-time preview. The key to this feature is listening to changes in the editor's input and updating the preview area in real time. When the user edits on the left, the right side should display the rendered result synchronously.
Tell the AI:
Listen to changes in the editor's input and update the preview area in real time. When the user edits on the left, the right side should display the rendered Markdown result synchronously.
This feature is easily implemented using React's state management. The AI will store the editor's content in state and pass it to the preview component, automatically updating the preview whenever the content changes.
- Add Code Highlighting
Code highlighting is also important, making code blocks look more professional. Tell the AI:
Configure react-syntax-highlighter to support syntax highlighting for code blocks. Support multiple programming languages like JavaScript, Python, Java, etc.
The AI will configure react-syntax-highlighter, rendering code blocks with syntax highlighting, displaying different syntax elements in different colors.
- Add Note Management Functionality
Finally, add note management functionality. Tell the AI:
Implement note management functionality:
- Add a note list on the left, displaying titles of all notes
- Clicking a note switches to that note
- Support creating new notes, deleting notes
- Support searching notes (by title)
- Data saved in LocalStorage
This prompt includes all the functional requirements, and the AI will implement them all at once.
Key Technical Points
The key to this project is implementing real-time Markdown preview. When the user edits on the left, the right side should display the rendered result in real time. This feature is easily achieved using the react-markdown library.
Code highlighting is also important; you can let the AI configure react-syntax-highlighter to support syntax highlighting for multiple programming languages. For better user experience, let the AI add optimizations like inserting spaces with Tab instead of switching focus, supporting shortcuts like Ctrl+B for bold, and auto-saving drafts.
Expansion Ideas
After completing the basic version, you can continue to expand features. For example, support image uploads to allow inserting images into notes; add table of contents navigation, automatically generating article outlines; support exporting to PDF for easy sharing; add theme switching, providing multiple editor themes; support multiple Markdown styles like GitHub style, standard style, etc.
4. Project Practice - Pomodoro Timer
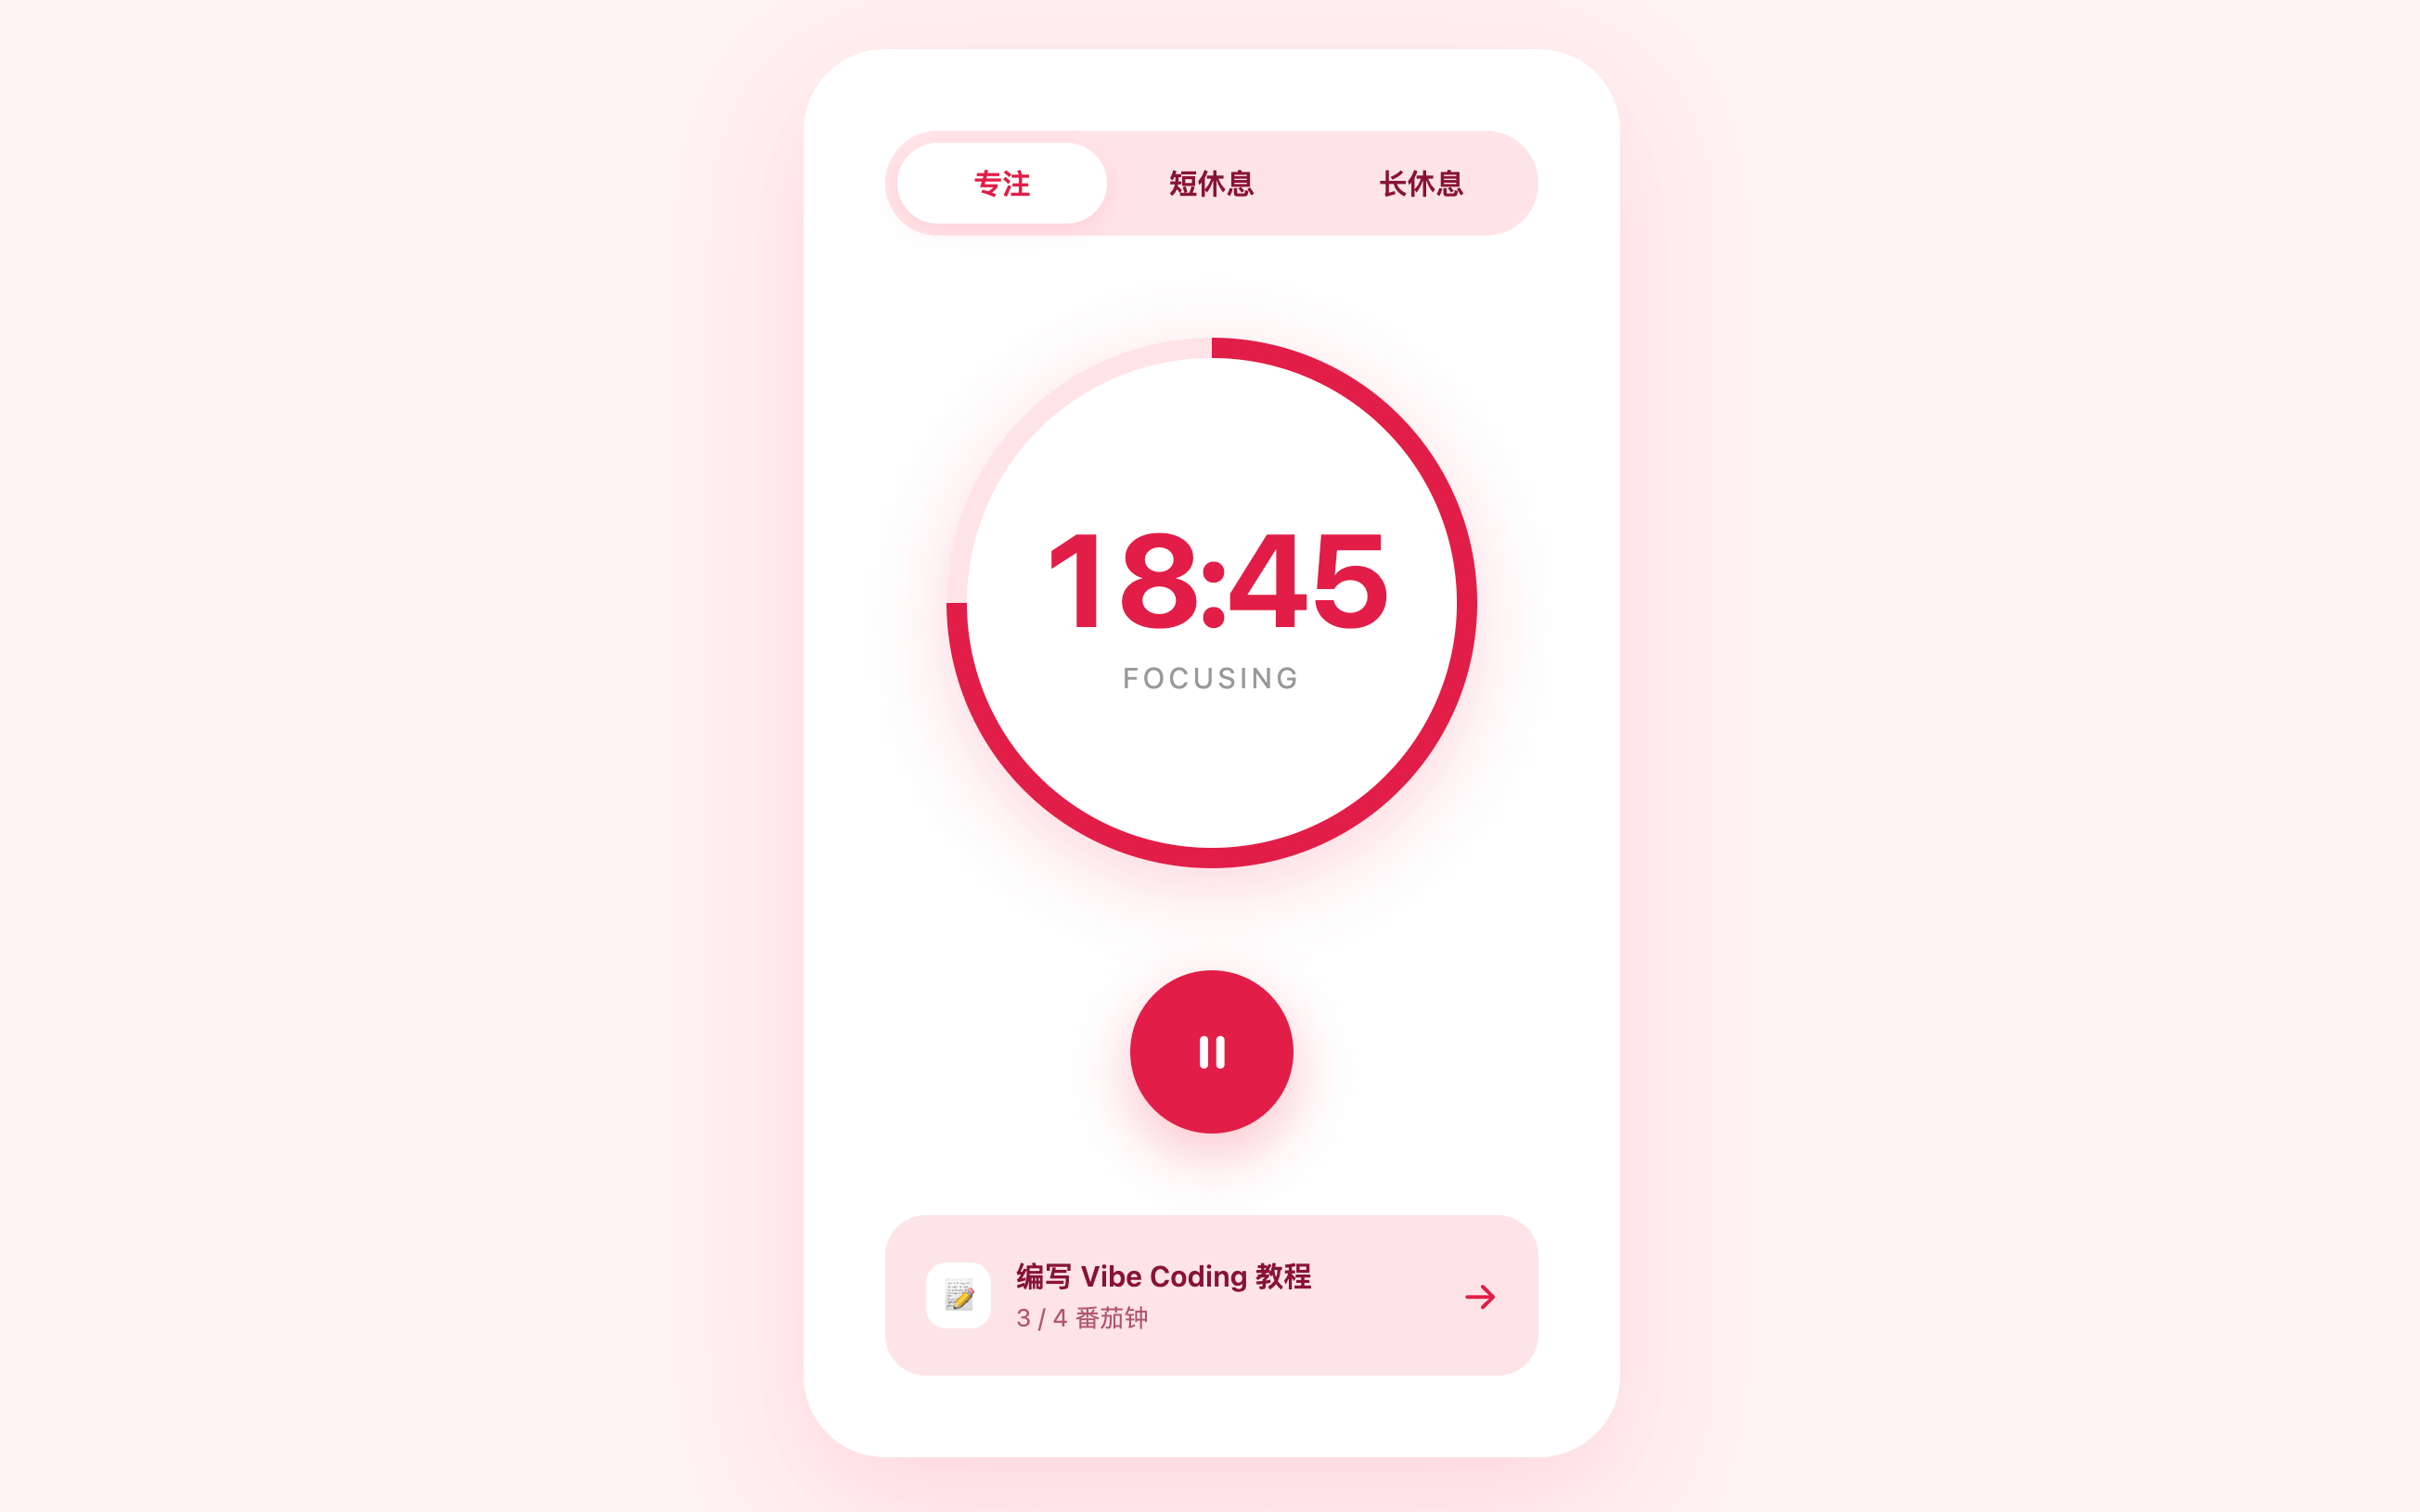
The previous projects focused on data display and management. Now, let's tackle a project involving timers and notifications. The Pomodoro Technique is a popular time management method, and building a Pomodoro app will help you learn how to handle timers, notifications, and other functionalities.
The Pomodoro Technique involves working for 25 minutes, then resting for 5 minutes, cycling through this pattern. This app will implement a countdown function, supporting start, pause, and reset. Users can customize work and rest durations. When time is up, notifications will be sent, and a sound can be played. Additionally, there's a statistics feature to record the number of completed Pomodoros, helping users understand their work efficiency.
For technology selection, we'll use React + TypeScript + Vite for the front-end, Tailwind CSS for styling, the browser's Notification API for notifications, and LocalStorage for data storage.
Development Steps
- Implement Countdown Logic
The core of development is implementing the countdown logic. Tell the AI:
Implement Pomodoro countdown functionality:
- Default work 25 minutes, rest 5 minutes
- Support start, pause, reset
- Display time format as MM:SS
- Trigger reminder when countdown ends
This prompt clearly states what functionality to implement. The AI will use JavaScript's setInterval to implement the countdown, decrementing by 1 every second, triggering a reminder when it reaches 0.
- Implement Notification Functionality
Then, implement the notification functionality. The browser's Notification API can send system notifications but requires user permission first. Tell the AI:
Implement browser notification functionality:
- Request notification permission when the page loads
- Send notification when countdown ends
- Notification title is "Pomodoro", content is "Time's up, take a break!"
This prompt specifies the notification trigger timing and content. The AI will first check if the browser supports notifications, request permission, and send notifications when time is up.
- Add Sound Effects
You can also add sound effects. Play a sound when time is up, so users know even if they're not looking at the screen. Tell the AI:
Add sound effect functionality:
- Prepare a sound file (place it in the public directory)
- Play the sound when countdown ends
The AI will use the Audio object to play the sound file.
- Add Statistics Functionality
Finally, add statistics functionality. Tell the AI:
Implement statistics functionality:
- Record the number of completed Pomodoros
- Display today's completed count, this week's completed count
- Data saved in LocalStorage
This way, users can see their work efficiency and feel more accomplished.
Key Technical Points
The core of this project is the countdown logic and notification functionality. The countdown must be accurate, decrementing by 1 every second without errors. The notification functionality requires user permission first; if denied, provide a friendly prompt.
For better user experience, update the page title during the countdown, so users can see the remaining time even when switching tabs. You can also add sound effects, playing a sound when time is up.
Expansion Ideas
After completing the basic version, you can continue to expand features. For example, add long break functionality, resting for 15 minutes after 4 Pomodoros; record daily Pomodoro counts, generating statistical charts; add task lists, associating Pomodoros with specific tasks; visualize data, displaying work efficiency with charts; or even support background music to enhance the work atmosphere.
5. Project Practice - Weather Query App
Finally, let's tackle our first project requiring external API calls. This project will help you learn how to interact with backend services, handle asynchronous requests, and errors.
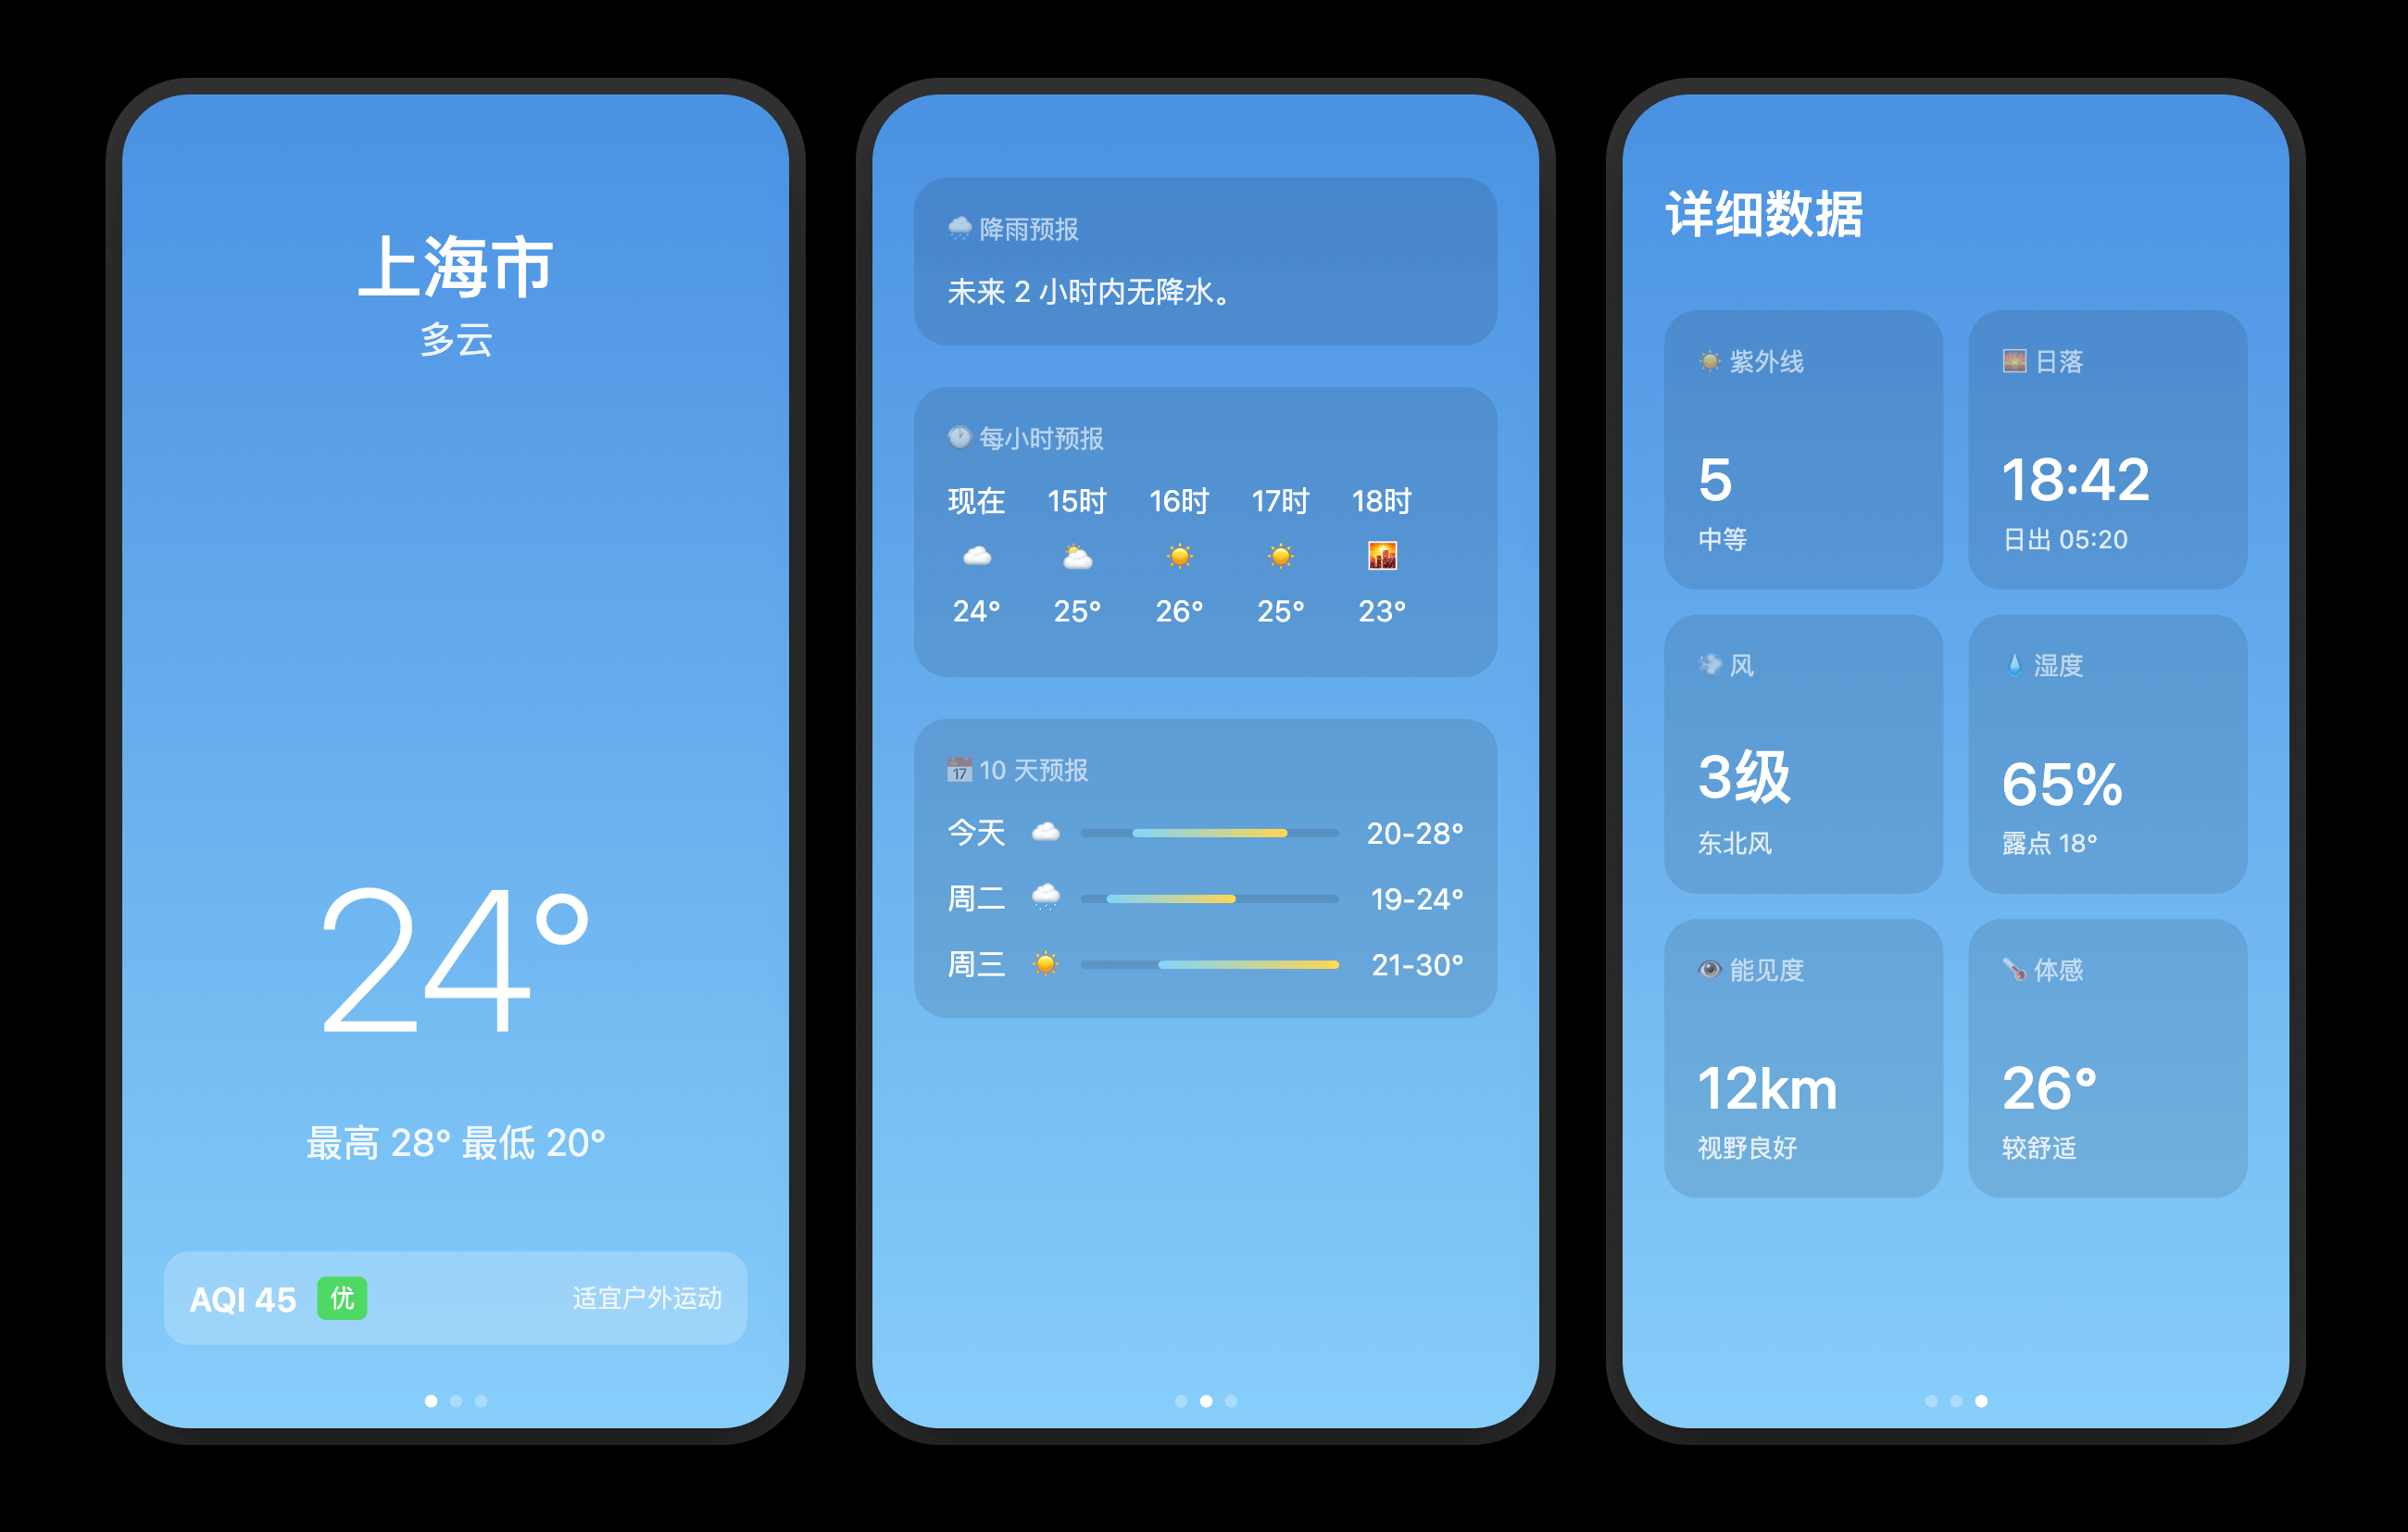
This project aims to implement weather query functionality. Users input a city name to query the current weather, displaying temperature, weather conditions, humidity, wind speed, etc. It also shows the weather forecast for the next few days. It can automatically fetch the user's location and display the weather. Frequently used cities can be favorited for quick queries.
For technology selection