261 lines
10 KiB
Markdown
261 lines
10 KiB
Markdown
## WPS里装上deepseek,简直就是办公神器
|
||
|
||
不得不说,将DeepSeek-R1接入WPS真的惊呆我了!这意味着什么?简单来说,文档编辑从“手动挡”进化成了“自动挡”!不管是生成内容、优化表达,甚至是逻辑推理分析,AI都能直接帮你搞定,爽到飞起!
|
||
|
||
今天就来给大家聊聊,如何在WPS里接入 **DeepSeek-R1**,一步步带你从零配置到实战,让AI真正成为你的文档处理助手。
|
||
|
||
|
||
|
||
## **为什么要在WPS里接入DeepSeek-R1?**
|
||
|
||
讲道理,我以前用WPS,大多数时候就是敲敲字、插插图、改改排版,写完了还得自己检查语法、优化表达,甚至有时候绞尽脑汁想一段好文案,简直像掏空灵魂。
|
||
|
||
但现在,DeepSeek-R1 直接进驻 WPS,相当于在文档里藏了一个AI小助手,帮你:
|
||
|
||
- **快速生成内容**:随便给个大纲,AI就能帮你扩展成一段流畅的文本。
|
||
- **优化表达**:写完的内容,总觉得有点别扭?AI可以帮你润色,变得更自然、更流畅。
|
||
- **逻辑推理**:写方案、分析数据、写报告?让AI来帮你理清逻辑,提升说服力。
|
||
|
||
这么一看,这不就是文档界的“外挂”吗?不装等啥呢?接下来就带你 **一步步配置**,让AI真正成为你的写作搭子。
|
||
|
||
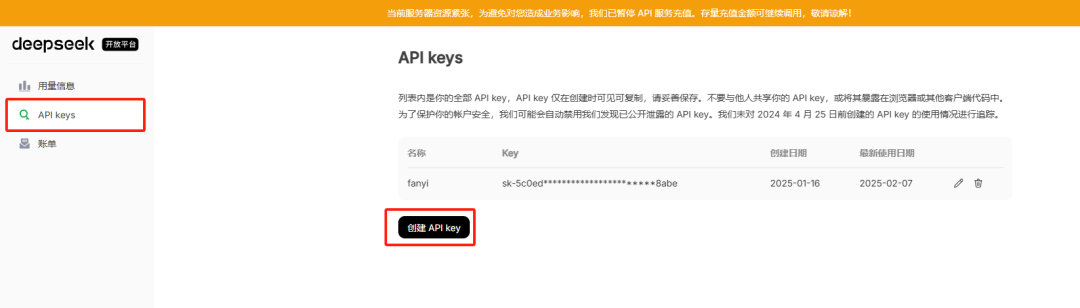
## **第一步:获取DeepSeek-R1的API Key**
|
||
|
||
要让DeepSeek-R1在WPS里跑起来,首先得有个 **API Key**,就像是进入AI世界的“通行证”。获取方式有两种:
|
||
|
||
### **方案一:DeepSeek官方API Key**
|
||
|
||
可以去官网申请:**[https://www.deepseek.com](https://link.zhihu.com/?target=https%3A//www.deepseek.com)**
|
||
|
||
|
||
|
||
### **方案二:腾讯云提供的DeepSeek-R1 API Key**
|
||
|
||
这个方案更靠谱,可以去这里申请:**[https://curl.qcloud.com/T3M5yBHp](https://link.zhihu.com/?target=https%3A//curl.qcloud.com/T3M5yBHp)**相对稳定,推荐使用!
|
||
|
||
⚠️ **重要提醒**:不管用哪个API Key,都得保证你的账户有余额,否则AI是不会搭理你的!
|
||
|
||
## **第二步:配置WPS开发工具**
|
||
|
||
既然AI要接入WPS,那就得打开WPS的开发模式,整个流程其实很简单,跟着来就行。
|
||
|
||
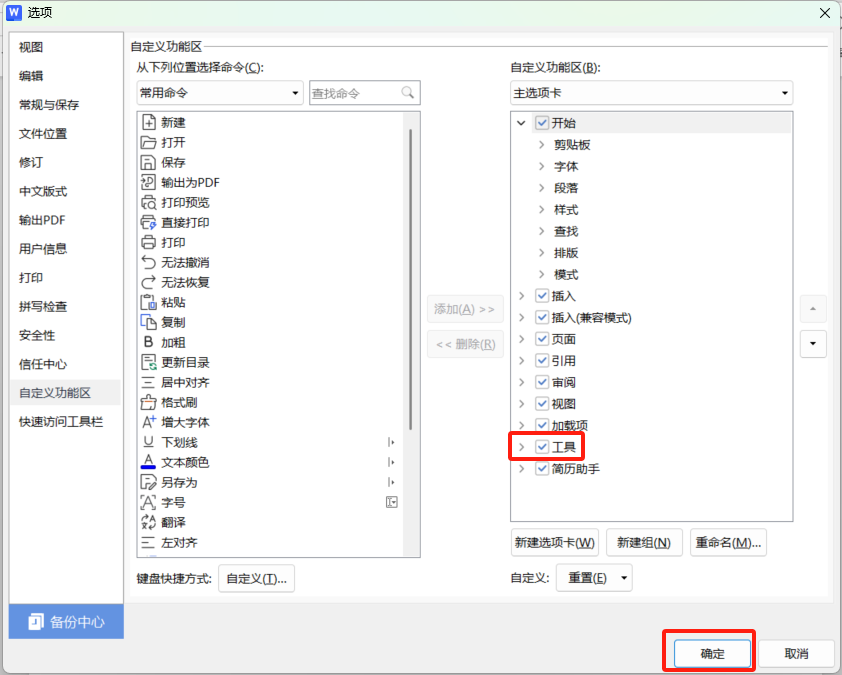
### **1. 启用开发工具**
|
||
|
||
- 打开 **WPS**,随便新建一个文档。
|
||
|
||

|
||
|
||
- 点击 **文件** → **选项** → **自定义功能区**。
|
||
- 在右侧的功能区列表中,找到 **“工具”**,勾选它。
|
||
|
||
|
||
|
||
- 点击 **“确定”**,保存设置。
|
||
|
||
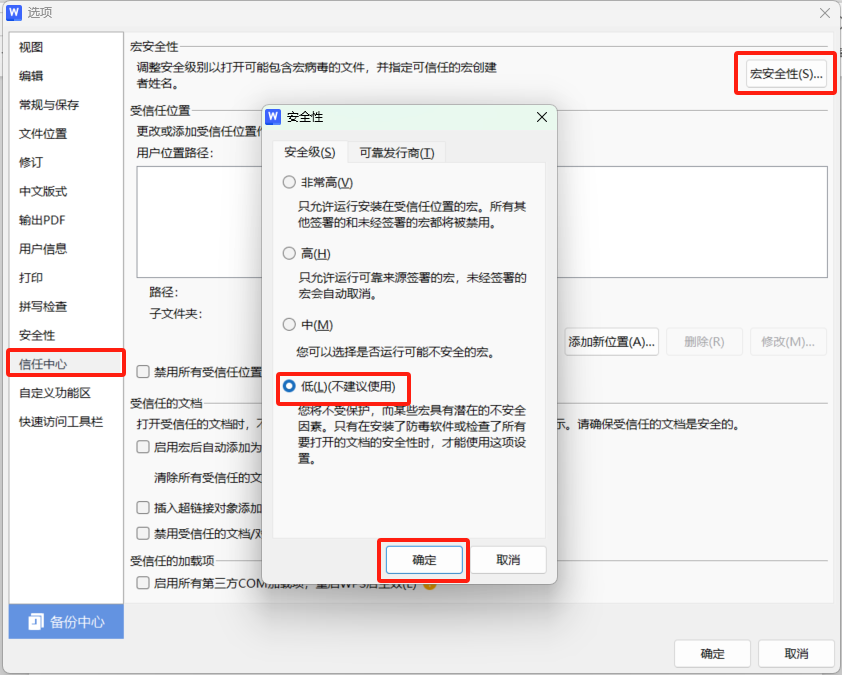
### **2. 配置信任中心**
|
||
|
||
|
||
|
||
1. 在 WPS 中,点击 **文件** → **选项** → **信任中心**。
|
||
2. 选择 **“信任中心设置”** → **“宏安全性”**。
|
||
3. 将安全性设置为 **“低”**,这样才能运行 VBA 宏。
|
||
|
||
### **3. 添加宏模块**
|
||
|
||
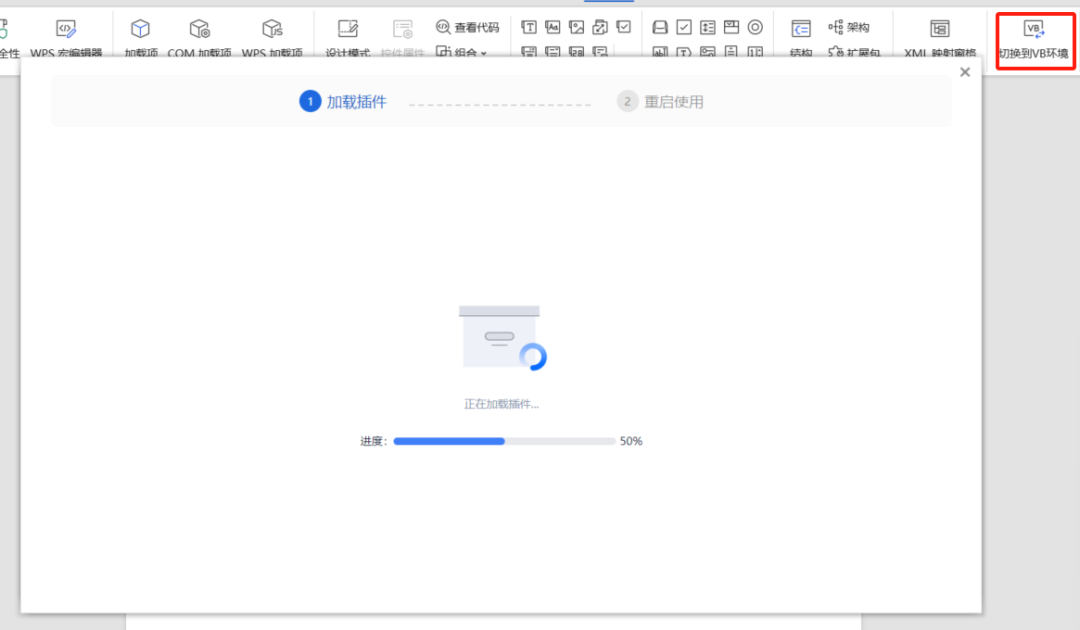
- 在 WPS 顶部菜单栏,点击 **工具** → **开发工具** → **切换到VB环境**,然后 **重启WPS**。
|
||
|
||

|
||
|
||
|
||
|
||
- 重启后,点击 **VB编辑器**。
|
||
|
||

|
||
|
||
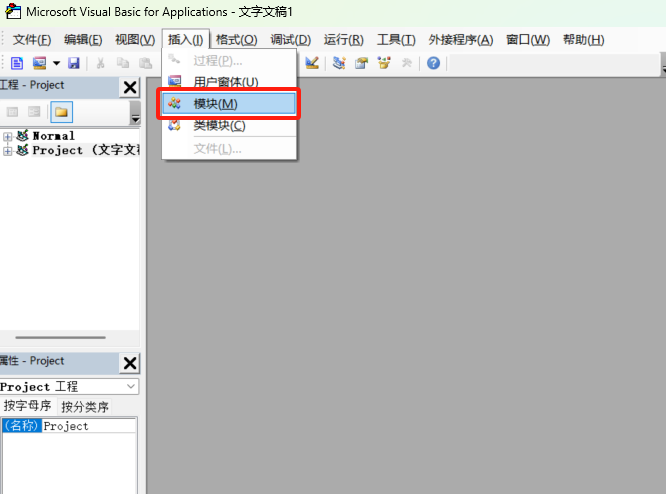
- 在弹出的 **VB编辑器窗口**,点击 **插入** → **模块**。
|
||
|
||
|
||
|
||
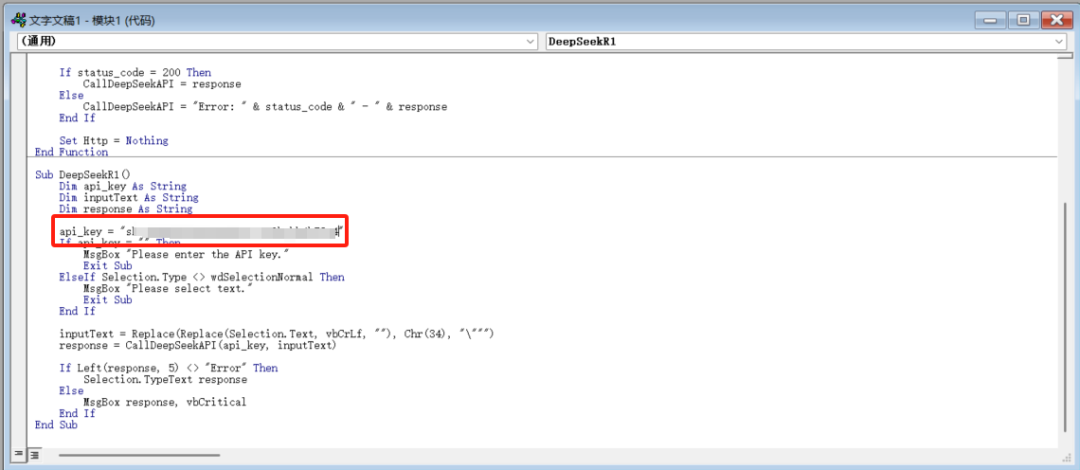
- 复制以下代码到编辑区里,并把 `your_api_key_here` 换成你申请到的API Key:
|
||
|
||
|
||
|
||
**保存代码**,关闭 VB 编辑器。
|
||
|
||
以下是**Deepseek-R1代码(官方apikey)**完整代码示例,记得替换为你的API Key:
|
||
|
||
```text
|
||
Function CallDeepSeekAPI(api_key As String, inputText As String) As String
|
||
Dim API As String
|
||
Dim SendTxt As String
|
||
Dim Http As Object
|
||
Dim status_code As Integer
|
||
Dim response As String
|
||
|
||
API = "https://api.deepseek.com/chat/completions"
|
||
SendTxt = "{""model"": ""deepseek-reasoner"", ""messages"": [{""role"":""system"", ""content"":""You are a Word assistant""}, {""role"":""user"", ""content"":""" & inputText & """}], ""stream"": false}"
|
||
|
||
Set Http = CreateObject("MSXML2.XMLHTTP")
|
||
With Http
|
||
.Open "POST", API, False
|
||
.setRequestHeader "Content-Type", "application/json"
|
||
.setRequestHeader "Authorization", "Bearer " & api_key
|
||
.send SendTxt
|
||
status_code = .Status
|
||
response = .responseText
|
||
End With
|
||
|
||
' 弹出窗口显示 API 响应(调试用)
|
||
|
||
' MsgBox "API Response: " & response, vbInformation, "Debug Info"
|
||
|
||
If status_code = 200 Then
|
||
CallDeepSeekAPI = response
|
||
Else
|
||
CallDeepSeekAPI = "Error: " & status_code & " - " & response
|
||
End If
|
||
|
||
Set Http = Nothing
|
||
End Function
|
||
|
||
Sub DeepSeekR1()
|
||
Dim api_key As String
|
||
Dim inputText As String
|
||
Dim response As String
|
||
Dim regex As Object
|
||
Dim reasoningRegex As Object
|
||
Dim contentRegex As Object
|
||
Dim matches As Object
|
||
Dim reasoningMatches As Object
|
||
Dim originalSelection As Object
|
||
Dim reasoningContent As String
|
||
Dim finalContent As String
|
||
|
||
api_key = "替换为你的api key"
|
||
If api_key = "" Then
|
||
MsgBox "Please enter the API key."
|
||
Exit Sub
|
||
ElseIf Selection.Type <> wdSelectionNormal Then
|
||
MsgBox "Please select text."
|
||
Exit Sub
|
||
End If
|
||
|
||
' 保存原始选中的文本
|
||
Set originalSelection = Selection.Range.Duplicate
|
||
|
||
inputText = Replace(Replace(Replace(Replace(Replace(Selection.text, "\", "\\"), vbCrLf, ""), vbCr, ""), vbLf, ""), Chr(34), "\""")
|
||
response = CallDeepSeekAPI(api_key, inputText)
|
||
|
||
If Left(response, 5) <> "Error" Then
|
||
' 创建正则表达式对象来分别匹配推理内容和最终回答
|
||
Set reasoningRegex = CreateObject("VBScript.RegExp")
|
||
With reasoningRegex
|
||
.Global = True
|
||
.MultiLine = True
|
||
.IgnoreCase = False
|
||
.Pattern = """reasoning_content"":""(.*?)"""
|
||
End With
|
||
|
||
Set contentRegex = CreateObject("VBScript.RegExp")
|
||
With contentRegex
|
||
.Global = True
|
||
.MultiLine = True
|
||
.IgnoreCase = False
|
||
.Pattern = """content"":""(.*?)"""
|
||
End With
|
||
|
||
' 提取推理内容
|
||
Set reasoningMatches = reasoningRegex.Execute(response)
|
||
If reasoningMatches.Count > 0 Then
|
||
reasoningContent = reasoningMatches(0).SubMatches(0)
|
||
reasoningContent = Replace(reasoningContent, "\n\n", vbNewLine)
|
||
reasoningContent = Replace(reasoningContent, "\n", vbNewLine)
|
||
reasoningContent = Replace(Replace(reasoningContent, """", Chr(34)), """", Chr(34))
|
||
End If
|
||
|
||
' 提取最终回答
|
||
Set matches = contentRegex.Execute(response)
|
||
If matches.Count > 0 Then
|
||
finalContent = matches(0).SubMatches(0)
|
||
finalContent = Replace(finalContent, "\n\n", vbNewLine)
|
||
finalContent = Replace(finalContent, "\n", vbNewLine)
|
||
finalContent = Replace(Replace(finalContent, """", Chr(34)), """", Chr(34))
|
||
|
||
' 取消选中原始文本
|
||
Selection.Collapse Direction:=wdCollapseEnd
|
||
|
||
' 插入推理过程(如果存在)
|
||
If Len(reasoningContent) > 0 Then
|
||
Selection.TypeParagraph
|
||
Selection.TypeText "推理过程:"
|
||
Selection.TypeParagraph
|
||
Selection.TypeText reasoningContent
|
||
Selection.TypeParagraph
|
||
Selection.TypeText "最终回答:"
|
||
Selection.TypeParagraph
|
||
End If
|
||
|
||
' 插入最终回答
|
||
Selection.TypeText finalContent
|
||
|
||
' 将光标移回原来选中文本的末尾
|
||
originalSelection.Select
|
||
Else
|
||
MsgBox "Failed to parse API response.", vbExclamation
|
||
End If
|
||
Else
|
||
MsgBox response, vbCritical
|
||
End If
|
||
End Sub
|
||
```
|
||
|
||
## **第三步:自定义功能区(加个AI按钮!)**
|
||
|
||
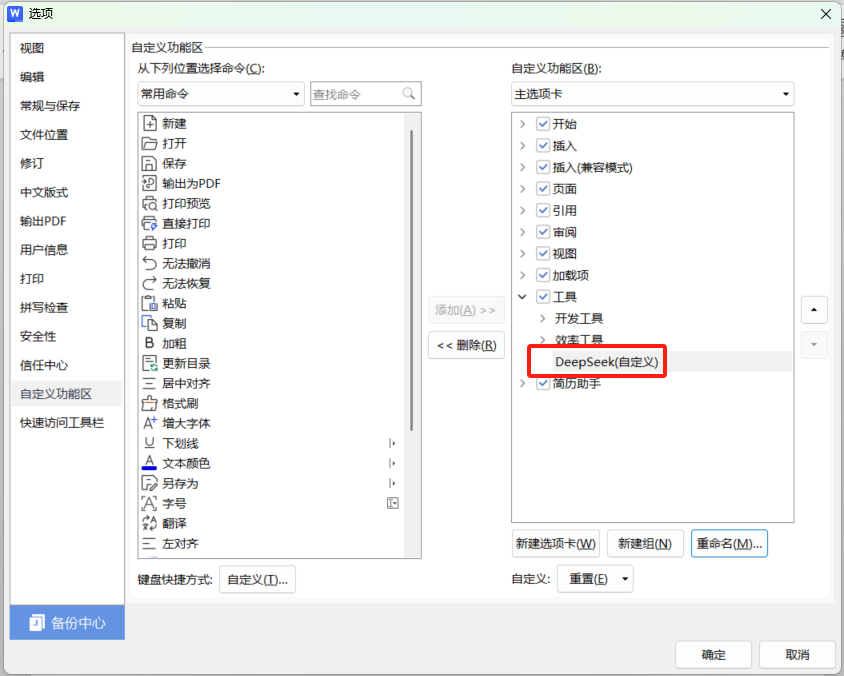
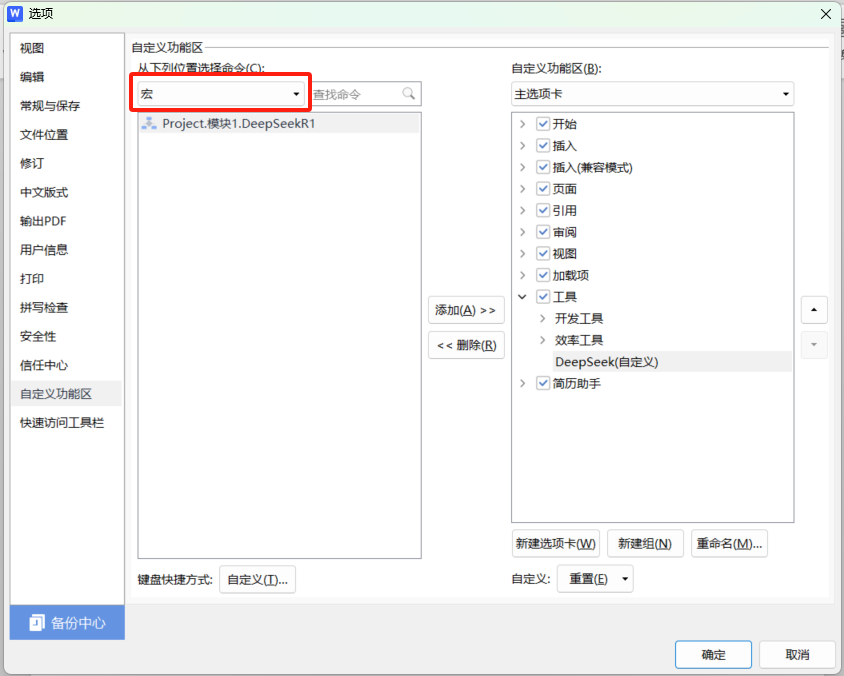
- 回到 WPS 主界面,点击 **文件** → **选项** → **自定义功能区**。
|
||
- 在右侧列表里,**新建一个组**,命名为 **DeepSeek**。
|
||
|
||
|
||
|
||
- 在左侧命令列表里,找到 **宏**,然后选中刚刚创建的 **GetAIResponse**。
|
||
|
||
|
||
|
||
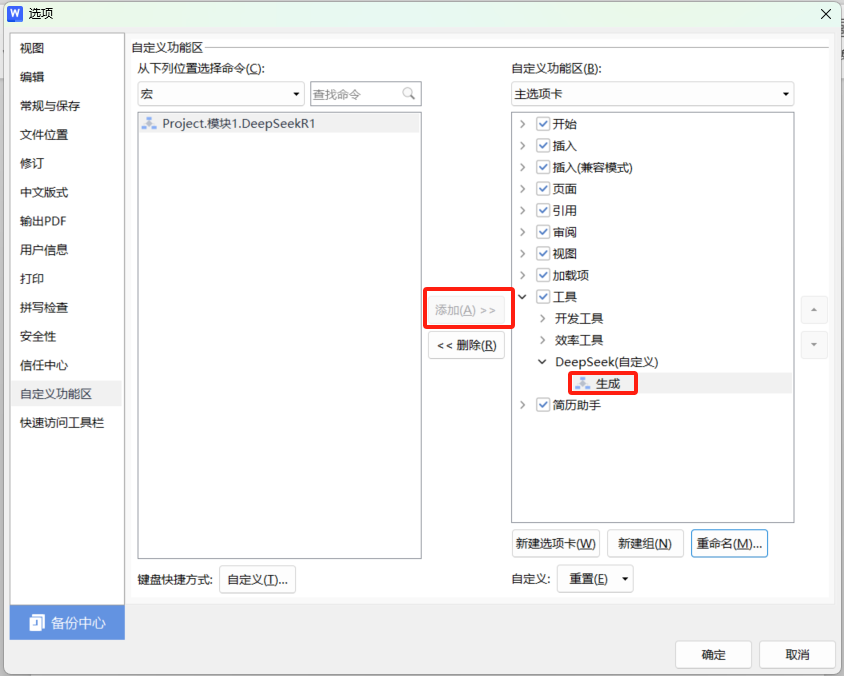
- 点击 **添加**,然后右键重命名为 **生成**。
|
||
|
||
|
||
|
||
- 点击 **确定**,保存设置。
|
||
|
||
现在,我们在WPS里加了一个专属按钮,点一下就能调用AI,牛不牛?
|
||
|
||
## **第四步:使用DeepSeek-R1生成内容(实战!)**
|
||
|
||
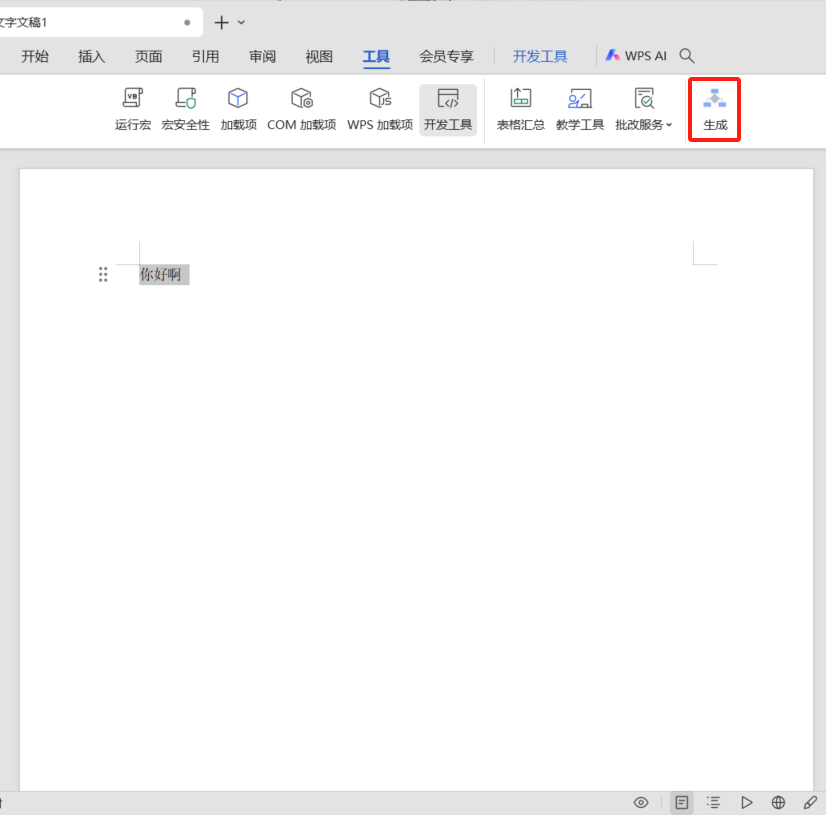
- **打开WPS文档**,随便输入一句话,比如:请输入一个关于AI未来的简短分析:
|
||
- **选中这句话**。
|
||
- 点击刚刚创建的 **生成** 按钮。
|
||
|
||
|
||
|
||
- **等待几秒**,AI会自动生成一段完整的分析,并直接插入到文档中!
|
||
|
||
这体验,就像请了个贴身秘书,随时帮你写文案、润色表达,甚至还能帮你分析问题。
|
||
|
||
## **第五步:创建WPS模板(以后直接用!)**
|
||
|
||
有了这个功能,我们可以保存成模板,省得每次都要重新配置:
|
||
|
||
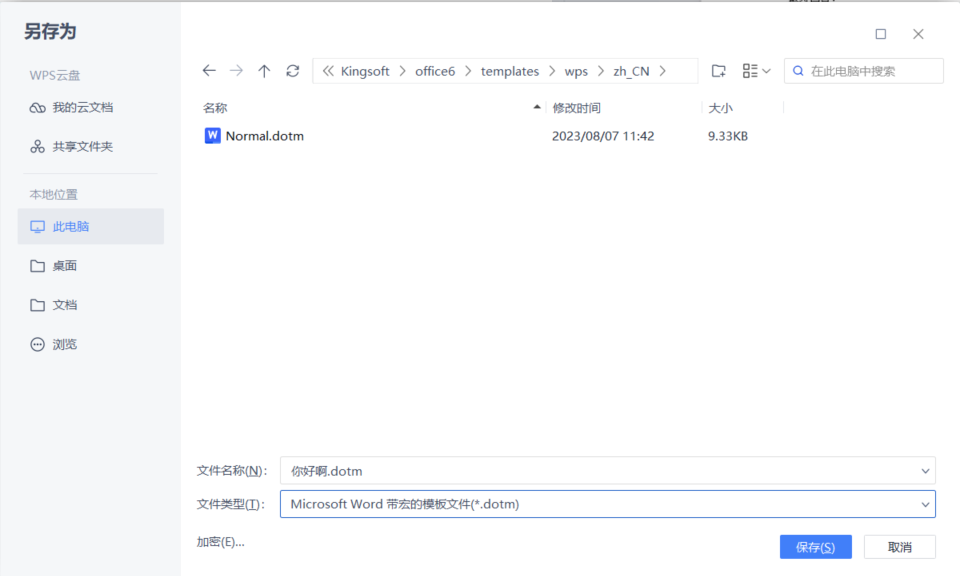
- **点击“文件” → “另存为”**。
|
||
- **在文件类型里选择** “Microsoft Word 带宏的模板文件(*.dotm)”。
|
||
|
||
|
||
|
||
- **保存到WPS的模板文件夹**(通常是这个路径):C:\Users\用户名\AppData\Roaming\kingsoft\wps\startup
|
||
|
||
**下次需要用的时候**,直接打开这个模板文件就能用AI写文档,简直不要太方便!
|
||
|
||
这波操作下来,我真的感觉自己是个“AI增强人”了——文档写作变得超高效,润色优化信手拈来,甚至还能让AI帮忙分析问题,真香!
|
||
|
||
以前写报告、整理方案,最痛苦的就是改来改去,现在有了 DeepSeek-R1,直接在 WPS 里一句话搞定,省下来的时间都够我刷两集番了。
|
||
|
||
你们觉得这个功能 **炸不炸**?赶紧试试,把 AI 请进你的 WPS,享受这飞一般的文档编辑体验!
|
||
|
||
> 来源:https://www.cnblogs.com/shanren/p/18709648 |